2012/12/19

PowerShellでGoogle Apps Email Migration APIを呼び出す

PowerShell Advent Calendar 2012参加企画。

この記事では、PowerShellでGoogle Apps Email Migration APIを呼び出すC#サンプルスクリプトをPowerShellに移植したものを紹介する。

PowerShellの利点はいくつもあるが、特筆すべきは以下の点だろう。
  • 対話的コマンドラインインターフェース(CLI)を備えている
  • プログラミング言語として現代的な文法を備えている
  • .NET Frameworkを扱うことができる
最初と二番目は、PowerShellは、CMD.exeでできたことを網羅しつつ、現代的な文法を備えたスクリプト言語、と言うことだ。Windows標準環境では、CMD.exeを使うことができたが、文法が貧弱でプログラミングが困難だった。同じくWindows標準環境では、VBScriptやJScriptなどの現代的なスクリプト言語が使えたが、対話的CLIが無かった。
三番目だが、Windows標準環境では、.NET Frameworkの重要度が上がっているが、CMD.exeではこれを直接扱う方法が無かった。PowerShellでは可能になった。

そこで、この記事では、PowerShellから.NET Frameworkへアクセスするスクリプトを紹介する。ただ、PowerShellから標準的な.NET Frameworkのライブラリにアクセスする方法は、他にもいい記事があるので、改めて紹介する意味は薄い。ここでは少し趣向を変え、PowerShellからGoogle Apps Email Migration APIを使う例を紹介する。Google Apps Email Migration APIのクライアントライブラリは、Java版・Python版の他に.NET版も提供されている。このサンプルスクリプトmigrationsample.csをPowerShellに移植した。コードmigrationsample.ps1(ダウンロード)は以下の通り。
<#
.SYNOPSIS
Sample script to demonstrate the use of the Google Apps Domain Migration API client library.

.DESCRIPTION
Sample script to demonstrate the use of the Google Apps Domain Migration API client library.
The original C# version is from https://developers.google.com/google-apps/email-migration/.

.INPUTS
Nothing.

.OUTPUTS
Nothing.
#>

[CmdletBinding()param(
    # The hosted domain (e.g. example.com) in which the migration will occur.
    [String]
    [parameter(Mandatory=$true)]
    $domain,

    # The username of the administrator or user migrating mail.
    [String]
    [parameter(Mandatory=$true)]
    $adminUsername,

    # The password of the administrator or user migrating mail.
    [String]
    [parameter(Mandatory=$true)]
    $adminPassword,

    # The username to which emails should be migrated.
    # End users can only transfer mail to their own mailboxes.
    # If unspecified, will default to login_email.
    [String]
    [parameter(Mandatory=$true)]
    $destinationUser = ''
)

#####
$REDIST_PATH = "$Env:ProgramFiles\Google\Google Data API SDK\Redist"
Add-Type -Path "$REDIST_PATH\Google.GData.Apps.dll"
Add-Type -Path "$REDIST_PATH\Google.GData.Client.dll"
Add-Type -Path "$REDIST_PATH\Google.GData.Extensions.dll"

$LabelFriend = New-Object Google.GData.Extensions.Apps.LabelElement("Friends")
$LabelEventInvitations = New-Object Google.GData.Extensions.Apps.LabelElement("Event Invitations")

$PropertyElementINBOX = [Google.GData.Extensions.Apps.MailItemPropertyElement]::INBOX
$PropertyElementSTARRED = [Google.GData.Extensions.Apps.MailItemPropertyElement]::STARRED
$PropertyElementUNREAD = [Google.GData.Extensions.Apps.MailItemPropertyElement]::UNREAD


[String]$rfcTxt = @"
Received: by 10.143.160.15 with HTTP; Mon, 16 Jul 2007 10:12:26 -0700 (PDT)
Message-ID: <_message_id_ mail.gmail.com="mail.gmail.com">
Date: Mon, 16 Jul 2007 10:12:26 -0700
From: "Mr. Serious" <serious adomain.com="adomain.com">
To: "Mr. Admin" <testadmin apps-provisioning-test.com="apps-provisioning-test.com">
Subject: Random Subject
MIME-Version: 1.0
Content-Type: text/plain; charset=ISO-8859-1; format=flowed
Content-Transfer-Encoding: 7bit
Content-Disposition: inline
Delivered-To: testadmin@apps-provisioning-test.com

This is a message delivered via DMAPI
"@

$random = New-Object Random


if($destinationUser -eq '') {
    $destinationUser = $adminUsername
}


$mailItemService = New-Object Google.GData.Apps.Migration.MailItemService($domain, "Sample Migration Application")
$mailItemService.setUserCredentials("$adminUsername@$domain", $adminPassword)


<#
.DESCRIPTION
Generates a random RFC822 message based on the template in rfcTxt.
We have to randomly modify the subject and message ID to prevent duplicate
supression by the Gmail server.

.INPUTS
Nothing.

.OUTPUTS
The randomly-modified RFC822 message.
#>
Function GenerateRandomRfcText
{
    ($rfcTxt -replace "Random Subject", "Random Subject $($random.Next())") `
        -replace "_message_id_", "$($random.Next())"
}


<#
.DESCRIPTION
Helper method to set up a new MailItemEntry.

.INPUTS
Nothing.

.OUTPUTS
The newly created MailItemEntry.
#>
Function SetupMailItemEntry
{
    param(
        # The batch ID for this entry.
        [String]$batchId
    )

    $entry = New-Object Google.GData.Apps.Migration.MailItemEntry

    [void]$entry.Labels.Add($LabelFriend)
    [void]$entry.Labels.Add($LabelEventInvitations)

    [void]$entry.MailItemProperties.Add($PropertyElementINBOX)
    [void]$entry.MailItemProperties.Add($PropertyElementSTARRED)
    [void]$entry.MailItemProperties.Add($PropertyElementUNREAD)

    $entry.Rfc822Msg = New-Object Google.GData.Extensions.Apps.Rfc822MsgElement(GenerateRandomRfcText)

    $entry.BatchData = New-Object Google.GData.Client.GDataBatchEntryData
    $entry.BatchData.Id = $batchId

    $entry
}


<#
.DESCRIPTION
Demonstrates inserting several mail items in a batch.

.INPUTS
Nothing.

.OUTPUTS
A MailItemFeed with the results of the insertions.
#>
Function BatchInsertMailItems
{
    param(
        # The number of entries to insert.
        [Int]$numToInsert
    )

    [Google.GData.Apps.Migration.MailItemEntry[]]$entries = @()

    # Set up the mail item entries to insert.
    foreach($index in 0..($numToInsert-1)) {
        $entries += SetupMailItemEntry([String]$index)
    }

    # Execute the batch request and print the results.
    [Google.GData.Apps.Migration.MailItemFeed]$batchResult = $mailItemService.Batch($domain, $destinationUser, $entries)
    [Google.GData.Client.AtomEntry]$entry = $Null
    foreach($entry in $batchResult.Entries) {
        [Google.GData.Client.GDataBatchEntryData]$batchData = $entry.BatchData

        Write-Host "Mail message $($batchData.Id): $($batchData.Status.Code) $($batchData.Status.Reason)"
    }

    $batchResult
}

try {
    # Insert several emails in a batch.
    [Google.GData.Apps.Migration.MailItemFeed]$batchResults = BatchInsertMailItems(10)
} catch [Google.GData.Client.GDataRequestException] {
    Write-Host ("Operation failed ({0}): {1}" -f $Error[0].Message, $Error[0].ResponseString)
}

使い方は次の通り。
migrationsample.ps1 domain userEmail password [destinationEmail]
ここで、domainは、Google Appsのドメイン名、userEmailpasswordは、対象となるユーザの資格情報。もしdestinationEmailを与えると、対象となるユーザを指定したことになり、その場合、userEmailpasswordは、Google Appsのドメイン管理者の資格情報を与える必要がある。

以下はその実行例。
PS C:\Users\user01> .\migrationsample.ps1 example.co.jp appsmaster 'password' appsuser
Mail message : 201 Created
PS C:\Users\user01>
この例では、10通すべてのメールデータの処理結果が状態コード201で、Google Apps上に移行されたことが判る。

なお、このコードを実行するためには、事前に次の作業を実行しておく必要がある。
  1. Google Data APIクライアントライブラリのダウンロードおよびインストール
  2. PowerShell実行ポリシの変更

実際のメールデータ移行作業での注意点については、こちらを参照して欲しい。

2012/12/04

Outlookのメッセージ作成で意図しないフォントが使われる

Outlookには、妙な「仕様」がある。メッセージを作成するときに、意図しないフォントが使われることがあるのだ(詳細は後述)。
これは、『KB414804: [OL2002] 半角英数字の入力時に フォントが Arial で表示される』でも触れられているのだが、MSによれば「仕様」であって、バグではないそうだ。これを回避するには、レジストリを操作する必要があるが、今回は、これをPowerShellで実行する方法を紹介する。

[Windows]+[R]でpowershellを起動し、以下の通り実行する。
PS C:\> New-ItemProperty 'HKCU:\Software\Microsoft\Office\11.0\Outlook\Preferences' -Name 'DontUseDualFont' -value 1 -propertyType DWORD


DontUseDualFont : 1
PSPath          : Microsoft.PowerShell.Core\Registry::HKEY_CURRENT_USER\Software\Microsoft\Office\11.0\Outlook\Preferences
PSParentPath    : Microsoft.PowerShell.Core\Registry::HKEY_CURRENT_USER\Software\Microsoft\Office\11.0\Outlook
PSChildName     : Preferences
PSDrive         : HKCU
PSProvider      : Microsoft.PowerShell.Core\Registry


PS C:\>
なお、上はOutlook2003の例。引数中の「11.0」は、Outlookのバージョンによって適宜換える必要がある。

以下、詳細。

Outlook 2003の場合、「ツール(T)」→「オプション(O)...」で、「オプション」ダイアログを表示される。


メッセージ形式に「テキスト形式」が選択されていることが確認できる。

さらに、「メール形式」タブ→「フォント(F)...」ボタンを押下すると、「フォント」ダイアログが表示される。


メッセージのフォントに「MS 明朝, 9 pt」が選択されていることが確認できる。

この状態でメッセージを作成した場合、常識的に考えれば、全角文字・半角文字双方にMS明朝が使われることが期待されるが、実際にはそうならない。メッセージを新規作成し、「テストtest」と入力し、その行をコピーして、次の行にペーストしてみよう。


 一行目と二行目の「test」のフォントが違うのが判る。


この二行をMS-Word等にコピー&ペーストしてみると判るが、一行目はArialで、二行目はMS明朝だ。

ここで、上の対策を実施し、Outlookを再起動して、同じようにメッセージを作成してみる。


期待通り、一行目と二行目の「test」のフォントが同じになった。


この二行をMS-Word等にコピー&ペーストすると、一行目・二行目共にMS明朝になっているのが判る。

この現象は、「テキスト形式」の場合だけでなく、「リッチテキスト形式」の場合にも発生する。

2012/12/03

The Sample Code of Google Apps Email Migration API in PowerShell

Google Apps Email Migration APIの.NET版のサンプルコードmigrationsample.csは、拡張子から判る通り、C#で記述してある。これをコンパイルして実行する方法は、『Google Apps Email Migration APIのC#サンプルプログラムをコンパイルし実行』で紹介した。

しかし、メールデータの移行と言った、一度しか行わないような作業に関して、C#の様なコンパイラ言語を使うのは牛刀割鶏、大げさすぎる。そこでこの記事では、Windowsの新スクリプト言語であるPowerShellを使う方法を紹介する。

コードmigrationsample.ps1(ダウンロード)は以下の通り。
<#
.SYNOPSIS
Sample script to demonstrate the use of the Google Apps Domain Migration API client library.

.DESCRIPTION
Sample script to demonstrate the use of the Google Apps Domain Migration API client library.
The original C# version is from https://developers.google.com/google-apps/email-migration/.

.INPUTS
Nothing.

.OUTPUTS
Nothing.
#>

[CmdletBinding()param(
    # The hosted domain (e.g. example.com) in which the migration will occur.
    [String]
    [parameter(Mandatory=$true)]
    $domain,

    # The username of the administrator or user migrating mail.
    [String]
    [parameter(Mandatory=$true)]
    $adminUsername,

    # The password of the administrator or user migrating mail.
    [String]
    [parameter(Mandatory=$true)]
    $adminPassword,

    # The username to which emails should be migrated.
    # End users can only transfer mail to their own mailboxes.
    # If unspecified, will default to login_email.
    [String]
    [parameter(Mandatory=$true)]
    $destinationUser = ''
)

#####
$REDIST_PATH = "$Env:ProgramFiles\Google\Google Data API SDK\Redist"
Add-Type -Path "$REDIST_PATH\Google.GData.Apps.dll"
Add-Type -Path "$REDIST_PATH\Google.GData.Client.dll"
Add-Type -Path "$REDIST_PATH\Google.GData.Extensions.dll"

$LabelFriend = New-Object Google.GData.Extensions.Apps.LabelElement("Friends")
$LabelEventInvitations = New-Object Google.GData.Extensions.Apps.LabelElement("Event Invitations")

$PropertyElementINBOX = [Google.GData.Extensions.Apps.MailItemPropertyElement]::INBOX
$PropertyElementSTARRED = [Google.GData.Extensions.Apps.MailItemPropertyElement]::STARRED
$PropertyElementUNREAD = [Google.GData.Extensions.Apps.MailItemPropertyElement]::UNREAD


[String]$rfcTxt = @"
Received: by 10.143.160.15 with HTTP; Mon, 16 Jul 2007 10:12:26 -0700 (PDT)
Message-ID: <_message_id_ mail.gmail.com="mail.gmail.com">
Date: Mon, 16 Jul 2007 10:12:26 -0700
From: "Mr. Serious" 
To: "Mr. Admin" 
Subject: Random Subject
MIME-Version: 1.0
Content-Type: text/plain; charset=ISO-8859-1; format=flowed
Content-Transfer-Encoding: 7bit
Content-Disposition: inline
Delivered-To: testadmin@apps-provisioning-test.com

This is a message delivered via DMAPI
"@

$random = New-Object Random


if($destinationUser -eq '') {
    $destinationUser = $adminUsername
}


$mailItemService = New-Object Google.GData.Apps.Migration.MailItemService($domain, "Sample Migration Application")
$mailItemService.setUserCredentials("$adminUsername@$domain", $adminPassword)


<#
.DESCRIPTION
Generates a random RFC822 message based on the template in rfcTxt.
We have to randomly modify the subject and message ID to prevent duplicate
supression by the Gmail server.

.INPUTS
Nothing.

.OUTPUTS
The randomly-modified RFC822 message.
#>
Function GenerateRandomRfcText
{
    ($rfcTxt -replace "Random Subject", "Random Subject $($random.Next())") `
        -replace "_message_id_", "$($random.Next())"
}


<#
.DESCRIPTION
Helper method to set up a new MailItemEntry.

.INPUTS
Nothing.

.OUTPUTS
The newly created MailItemEntry.
#>
Function SetupMailItemEntry
{
    param(
        # The batch ID for this entry.
        [String]$batchId
    )

    $entry = New-Object Google.GData.Apps.Migration.MailItemEntry

    [void]$entry.Labels.Add($LabelFriend)
    [void]$entry.Labels.Add($LabelEventInvitations)

    [void]$entry.MailItemProperties.Add($PropertyElementINBOX)
    [void]$entry.MailItemProperties.Add($PropertyElementSTARRED)
    [void]$entry.MailItemProperties.Add($PropertyElementUNREAD)

    $entry.Rfc822Msg = New-Object Google.GData.Extensions.Apps.Rfc822MsgElement(GenerateRandomRfcText)

    $entry.BatchData = New-Object Google.GData.Client.GDataBatchEntryData
    $entry.BatchData.Id = $batchId

    $entry
}


<#
.DESCRIPTION
Demonstrates inserting several mail items in a batch.

.INPUTS
Nothing.

.OUTPUTS
A MailItemFeed with the results of the insertions.
#>
Function BatchInsertMailItems
{
    param(
        # The number of entries to insert.
        [Int]$numToInsert
    )

    [Google.GData.Apps.Migration.MailItemEntry[]]$entries = @()

    # Set up the mail item entries to insert.
    foreach($index in 0..($numToInsert-1)) {
        $entries += SetupMailItemEntry([String]$index)
    }

    # Execute the batch request and print the results.
    [Google.GData.Apps.Migration.MailItemFeed]$batchResult = $mailItemService.Batch($domain, $destinationUser, $entries)
    [Google.GData.Client.AtomEntry]$entry = $Null
    foreach($entry in $batchResult.Entries) {
        [Google.GData.Client.GDataBatchEntryData]$batchData = $entry.BatchData

        Write-Host "Mail message $($batchData.Id): $($batchData.Status.Code) $($batchData.Status.Reason)"
    }

    $batchResult
}

try {
    # Insert several emails in a batch.
    [Google.GData.Apps.Migration.MailItemFeed]$batchResults = BatchInsertMailItems(10)
} catch [Google.GData.Client.GDataRequestException] {
    Write-Host ("Operation failed ({0}): {1}" -f $Error[0].Message, $Error[0].ResponseString)
}
このコードを実行するには、Google Data APIをインストールしておく必要がある。『Google Data API Installer MSIのダウンロード』および『Google Data API Installer MSIのインストール』の通りにインストールする。
また、『PowerShell実行ポリシの変更』の通り、ローカルスクリプトを実行できるようPowerShellの実行ポリシを変更しておく必要もある。

以下の通り実行する。
PS C:\Users\user01> .\migrationsample.ps1 example.co.jp appsmaster 'password' appsuser
Mail message : 201 Created
PS C:\Users\user01>
この例では、10通すべてのメールデータの処理結果が状態コード201で、Google Apps上に移行されたことが判る。

なお、実際のメールデータを移行した場合、以下のような結果を得る。
状態コード201 / Created
正常終了。Google Apps上にメールデータが作成された。ただし、このメッセージを受けてから、Gmailのウェブインターフェース上から参照できるようになるまでには、若干(数分間~数十分間)時間がかかることがある。
状態コード400 / Permanent failure: BadAttachment
添付ファイル形式の異常。Gmailでは、実行形式の添付ファイルが禁止されているが、その様なメールを移行しようとした場合。
状態コード400 / Permanent failure: Insert failed, badly formed message.
メールのサイズが大きすぎる。最大一通当り10MB。
状態コード400 / Bad Request
RFC5322形式(所謂RFC822形式)として正しくないデータ。ドキュメントによると、From:To:、およびDate:のヘッダフィールドが必須。未検証。
状態コード503 / The server is currently busy and could not complete your request. Please try again in 30 seconds.
クラウド側が高負荷状態のため、処理に失敗した。ドキュメントによると、この状態コードを得た場合、xponential backoff方式で再試行せよ、とある。例えば、1回この状態なら次の再試行は30秒後、続けて2回この状態なら次の再試行は60秒後、…と言う様に、続けてn回この状態なら次の再試行は30×2^(n-1)秒後、と言う様に処理する。
実行時エラー
以下の様な実行時エラーが発生する場合がある。バッチ呼び出しの最大サイズ制限に抵触している場合などに発生する。一回のバッチ呼び出しで、メールサイズの合計は、25MB以下に抑えなければならない。
"3" 個の引数を指定して "Batch" を呼び出し中に例外が発生しました: "転送接続にデータを書き込めません: 既存の接続はリモート ホストに強制的に切断されました。。"
発生場所 C:\path\to\script.ps1:line number 文字:charactor number
+                 [Google.GData.Apps.Migration.MailItemFeed]$result = $script:mailItemService.Batch <<<< ($domain, $user, $list)
    + CategoryInfo          : NotSpecified: (:) []、MethodInvocationException
    + FullyQualifiedErrorId : DotNetMethodException
"3" 個の引数を指定して "Batch" を呼び出し中に例外が発生しました: "Execution of request failed: https://apps-apis.google.com/a/feeds/migration/2.0/example.com/username/mail/batch"
発生場所 C:\path\to\script.ps1:line number 文字:charactor number
+                 [Google.GData.Apps.Migration.MailItemFeed]$result = $script:mailItemService.Batch <<<< ($domain, $user, $list)
    + CategoryInfo          : NotSpecified: (:) []、MethodInvocationException
    + FullyQualifiedErrorId : DotNetMethodException

コーディング上注意して欲しいのは、メールデータはUTF-8でなければならない点。日本語のメールデータは通常、ISO-2022-JPで符号化されているため、そのままでは不正なデータとされ、処理されない。これを回避するためには、メールデータ全体をBASE64で符号化する必要がある。

2012/11/29

Google Apps Email Migration APIのC#サンプルプログラムをコンパイルし実行・その7・サンプルコードのコンパイル

[Windows]+[R]を押下する。


PowerShellを通常モードで起動する。

応答ファイルを準備する

C#コンパイラの応答ファイル(Response File)を準備する。

応答ファイルGoogleDataAPI.rspを以下の通り作成する。
PS C:\Users\user01\Downloads> $REDIST="$Env:Programfiles\Google\Google Data API SDK\Redist"
PS C:\Users\user01\Downloads> $(echo "/lib:`"$REDIST`""; dir $REDIST\*.dll -exclude 'zlib.*' | foreach {"/r:$($_.Name)"}) > GoogleDataAPI.rsp
PS C:\Users\user01\Downloads>

内容を確認する。
PS C:\Users\user01\Downloads> cat .\GoogleDataAPI.rsp
/lib:"C:\Program Files\Google\Google Data API SDK\Redist"
/r:Google.GData.AccessControl.DLL
/r:Google.GData.Analytics.dll
/r:Google.GData.Apps.dll
/r:Google.GData.Blogger.dll
/r:Google.GData.Calendar.dll
/r:Google.GData.Client.dll
/r:Google.GData.Contacts.dll
/r:Google.GData.ContentForShopping.dll
/r:Google.GData.Documents.dll
/r:Google.GData.Extensions.dll
/r:Google.GData.Photos.dll
/r:Google.GData.Spreadsheets.dll
/r:Google.GData.WebmasterTools.dll
/r:Google.GData.YouTube.dll
/r:Newtonsoft.Json.dll
PS C:\Users\user01\Downloads>


Aliasの設定

C#コンパイラcsc.exeは、インストールされている.Net Frameworkのバージョン毎に存在していて、PATHが通っていない。毎回フルパスで指定するのは煩雑なので、エイリアスを設定する。以下の通り作業する。ここでは、.Net Framework v3.5のcsc.exeを使う。
PS C:\Users\user01\Downloads> Set-Alias csc $Env:windir\Microsoft.NET\Framework\v3.5\csc.exe
PS C:\Users\user01\Downloads> 

以下の通り確認する。
PS C:\Users\user01\Downloads> csc
Microsoft (R) Visual C# 2008 Compiler version 3.5.30729.5420
for Microsoft (R) .NET Framework version 3.5
Copyright (C) Microsoft Corporation. All rights reserved.

fatal error CS2008: 入力が指定されていません。
PS C:\Users\user01\Downloads>

コンパイル

その1・サンプルコードのダウンロード』でダウンロードしたmigrationsample.csをコンパイルする。コンパイルする際、前に作成した応答ファイルGoogleDataAPI.rspを指定する。
PS C:\Users\user01\Downloads> csc '@GoogleDataAPI.rsp' migrationsample.cs
Microsoft (R) Visual C# 2008 Compiler version 3.5.30729.5420
for Microsoft (R) .NET Framework version 3.5
Copyright (C) Microsoft Corporation. All rights reserved.

warning CS1685: 定義済みの型 'System.Runtime.CompilerServices.ExtensionAttribute' は、グローバル
        エイリアスの複数のアセンブリ内で定義されています。'c:\Program Files\Reference
        Assemblies\Microsoft\Framework\v3.5\System.Core.dll' からの定義を使用してください。
PS C:\Users\user01\Downloads> 

警告が表示されるが、コンパイルは正常に終了していて、migrationsample.exeが作成されている。
PS C:\Users\user01\Downloads> dir


    ディレクトリ: C:\Users\user01\Downloads


Mode                LastWriteTime     Length Name
----                -------------     ------ ----
-a---        2012/10/17     23:09       2433 Add-AssemblyToGlobalAssemblyCache.ps1
-a---        2012/10/17     23:18       1046 GoogleDataAPI.rsp
-a---        2012/10/17     22:38   29167616 Google_Data_API_Setup_2.1.0.0.msi
-a---        2012/10/17     22:29       8008 migrationsample.cs
-a---        2012/10/17     23:33       9728 migrationsample.exe


PS C:\Users\user01\Downloads>

引数を与えずに実行すると、使い方が表示される。
PS C:\Users\user01\Downloads> .\migrationsample.exe
Usage:
  migration_sample    [destination_email]

domain:
  The hosted domain (e.g. example.com) in which the migration will occur.

login_user:
  The username of the administrator or user migrating mail.

login_password:
  The password of the administrator or user migrating mail.

destination_user:
  The username to which emails should be migrated. End users can only transfer mail to their own mailboxes.  If unspecified, will default to login_email.
PS C:\Users\user01\Downloads>


その0・概要
その1・サンプルコードのダウンロード
その2・Google Data API Installer MSIのダウンロード
その3・Global Assembly Cache Toolのダウンロードと改造
その4・Google Data API Installer MSIのインストール
その5・PowerShell実行ポリシの変更
その6・Google Data APIアセンブリのGACへのインストール
その7・サンプルコードのコンパイル

Google Apps Email Migration APIのC#サンプルプログラムをコンパイルし実行・その6・Google Data APIアセンブリのGACへのインストール

PowerShellを管理者モードで起動する。


「スタート」ボタンから、「すべてのプログラム」→「アクセサリ」→「Windows PowerShell」の順で開き、「Windows PowerShell」を右クリックし、「管理者として実行(A)...」を選択する。


UACダイアログが表示される。確認し、「はい(Y)」ボタンを押下する。

Googe Data APIが正常にインストールされていれば、以下の通りDLLが確認できる。
PS C:\Users\user01\Downloads> $REDIST="$Env:Programfiles\Google\Google Data API SDK\Redist"
PS C:\Users\user01\Downloads> dir $REDIST


    ディレクトリ: C:\Program Files\Google\Google Data API SDK\Redist


Mode                LastWriteTime     Length Name
----                -------------     ------ ----
d----        2012/10/17     22:59            Debug
-a---        2012/05/27     16:49      24576 Google.GData.AccessControl.DLL
-a---        2012/05/27     16:49      24064 Google.GData.Analytics.dll
-a---        2012/05/27     16:49      73728 Google.GData.Apps.dll
-a---        2012/05/27     16:49       8192 Google.GData.Blogger.dll
-a---        2012/05/27     16:49      36864 Google.GData.Calendar.dll
-a---        2012/05/27     16:49     212992 Google.GData.Client.dll
-a---        2012/05/27     16:49      29184 Google.GData.Contacts.dll
-a---        2012/05/27     16:49      39424 Google.GData.ContentForShopping.dll
-a---        2012/05/27     16:49      53248 Google.GData.Documents.dll
-a---        2012/05/27     16:49      90112 Google.GData.Extensions.dll
-a---        2012/05/27     16:49      45056 Google.GData.Photos.dll
-a---        2012/05/27     16:49      40960 Google.GData.Spreadsheets.dll
-a---        2012/05/27     16:49      24064 Google.GData.WebmasterTools.dll
-a---        2012/05/27     16:49      73728 Google.GData.YouTube.dll
-a---        2012/05/27     16:49     375296 Newtonsoft.Json.dll
-a---        2012/05/27     16:49      59904 zlib.x86.dll


PS C:\Users\user01\Downloads>
しかし、インストール直後は、これらがglobal assembly cache(以下、GAC)にはインストールされていない。以下の通り確認する。

PS C:\Users\user01\Downloads> dir "$Env:windir\assembly\GAC_MSIL" -filter "Google*"
PS C:\Users\user01\Downloads>

Google Data APIのアセンブリをGACにインストールする。以下の通り実行する。

PS C:\Users\user01\Downloads> $REDIST_PATH = "$Env:ProgramFiles\Google\Google Data API SDK\Redist"
PS C:\Users\user01\Downloads> dir $REDIST\*.dll -exclude 'zlib.*' | .\Add-AssemblyToGlobalAssemblyCache.ps1
PS C:\Users\user01\Downloads>

GACにインストールされたことを以下の通り確認する。

PS C:\Users\user01\Downloads> dir "$Env:windir\assembly\GAC_MSIL" -filter "Google*"


    ディレクトリ: C:\Windows\assembly\GAC_MSIL


Mode                LastWriteTime     Length Name
----                -------------     ------ ----
d----        2012/10/17     23:11            Google.GData.AccessControl
d----        2012/10/17     23:11            Google.GData.Analytics
d----        2012/10/17     23:11            Google.GData.Apps
d----        2012/10/17     23:11            Google.GData.Blogger
d----        2012/10/17     23:11            Google.GData.Calendar
d----        2012/10/17     23:11            Google.GData.Client
d----        2012/10/17     23:11            Google.GData.Contacts
d----        2012/10/17     23:11            Google.GData.Documents
d----        2012/10/17     23:11            Google.GData.Extensions
d----        2012/10/17     23:11            Google.GData.Photos
d----        2012/10/17     23:11            Google.GData.Spreadsheets
d----        2012/10/17     23:11            Google.GData.YouTube


PS C:\Users\user01\Downloads>


その0・概要
その1・サンプルコードのダウンロード
その2・Google Data API Installer MSIのダウンロード
その3・Global Assembly Cache Toolのダウンロードと改造
その4・Google Data API Installer MSIのインストール
その5・PowerShell実行ポリシの変更
その6・Google Data APIアセンブリのGACへのインストール
その7・サンプルコードのコンパイル

Google Apps Email Migration APIのC#サンプルプログラムをコンパイルし実行・その5・PowerShell実行ポリシの変更

OSインストール直後の状態では、ローカルのPowerShellスクリプトを実行できない。これを変更する。
PowerShellを管理者モードで起動する。


「スタート」ボタンから、「すべてのプログラム」→「アクセサリ」→「Windows PowerShell」の順で開き、「Windows PowerShell」を右クリックし、「管理者として実行(A)...」を選択する。


UACダイアログが表示される。確認し、「はい(Y)」ボタンを押下する。

PS C:\Users\user01\Downloads> Set-ExecutionPolicy RemoteSigned -Force
PS C:\Users\user01\Downloads>


その0・概要
その1・サンプルコードのダウンロード
その2・Google Data API Installer MSIのダウンロード
その3・Global Assembly Cache Toolのダウンロードと改造
その4・Google Data API Installer MSIのインストール
その5・PowerShell実行ポリシの変更
その6・Google Data APIアセンブリのGACへのインストール
その7・サンプルコードのコンパイル

Google Apps Email Migration APIのC#サンプルプログラムをコンパイルし実行・その4・Google Data API Installer MSIのインストール

Google Data APIをインストールする。


』で保存したGoogle_Data_API_Setup_2.1.0.0.msiをダブルクリックする。


「Google Data API SDK Setup Wizard」が起動される。「Next>」ボタンを押下する。


Everyone」ラジオボタンを選択し、「Next>」ボタンを押下する。


Next>」ボタンを押下する。


進行状況が表示される。


UACダイアログが表示される。確認の上、「はい(Y)」ボタンを押下する。


進行状況が表示される。


インストールが正常終了したことを確認し、「Close>」ボタンを押下する。


その0・概要
その1・サンプルコードのダウンロード
その2・Google Data API Installer MSIのダウンロード
その3・Global Assembly Cache Toolのダウンロードと改造
その4・Google Data API Installer MSIのインストール
その5・PowerShell実行ポリシの変更
その6・Google Data APIアセンブリのGACへのインストール
その7・サンプルコードのコンパイル

Google Apps Email Migration APIのC#サンプルプログラムをコンパイルし実行・その3・Global Assembly Cache Toolのダウンロードと改造

ダウンロード

Global Assembly Cache Tool in PowerShell: Add-AssemblyToGlobalAssemblyCache.ps1

ブラウザで『The Identity Management Explorer: Use Powershell to put your assemblies in the GAC』を開く。


画面中央「script」リンクをクリックする。


「ダウンロード」ボタンを押下する。


「直接ダウンロード」を選択する。


「保存(S)」ボタンを押下し、ファイルを適切な場所に

ブロックの解除

ダウンロードしたファイルに対して、以下を実行する。


右クリックから「プロパティ(R)」を選択する。


「ブロックの解除(K)」ボタンを押下する。

スクリプトの修正

ダウンロードしたAdd-AssemblyToGlobalAssemblyCache.ps1を改造する。このスクリプトは、アセンブリをglobal assembly cache(以下、GAC)にインストールするが、オリジナル版のスクリプトは、アセンブリがデジタル署名されていることを必須条件としている。

一方、『その2・Google Data API Installer MSIのダウンロード』でダウンロードしたGoogle_Data_API_Setup_2.1.0.0.msiでインストールされるDLLは、デジタル署名されていない。このため、このままではこのスクリプトではこれらのDLLをGACに登録できない。

以下の通り編集する。

メモ帳でAdd-AssemblyToGlobalAssemblyCache.ps1を開く。
PS C:\Users\user01\Downloads> notepad .\Add-AssemblyToGlobalAssemblyCache.ps1

赤字の部分を追加する。
$LoadedAssembly = [System.Reflection.Assembly]::LoadFile($Assembly)

#        if ($LoadedAssembly.GetName().GetPublicKey().Length -eq 0)
#        {
#            throw "The assembly '$Assembly' must be strongly signed."
#        }

        Write-Verbose "Installing: $Assembly"
        $PublishObject.GacInstall($Assembly)


その0・概要
その1・サンプルコードのダウンロード
その2・Google Data API Installer MSIのダウンロード
その3・Global Assembly Cache Toolのダウンロードと改造
その4・Google Data API Installer MSIのインストール
その5・PowerShell実行ポリシの変更
その6・Google Data APIアセンブリのGACへのインストール
その7・サンプルコードのコンパイル

Google Apps Email Migration APIのC#サンプルプログラムをコンパイルし実行・その2・Google Data API Installer MSIのダウンロード

ダウンロード

ブラウザで『Protocol Basics - Google Data APIs ― Google Developers』を開く。


Audience」リンクをクリックする。


client libraries」リンクをクリックする。


画面を下に移動する。


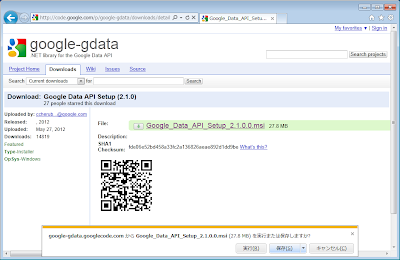
「.Net」行の「Library Download」列「Download」リンクをクリックする。


Google_Data_API_Setup_2.1.0.0.msi」リンクをクリックする。


Google_Data_API_Setup_2.1.0.0.msi」リンクをクリックする。


「保存(S)」ボタンを押下し、適切な場所にファイルを保存する。

ブロックの解除


ダウンロードしたファイル対して、以下を実行する。


右クリックから「プロパティ(R)」を選択する。


「ブロックの解除(K)」ボタンを押下する。


その0・概要
その1・サンプルコードのダウンロード
その2・Google Data API Installer MSIのダウンロード
その3・Global Assembly Cache Toolのダウンロードと改造
その4・Google Data API Installer MSIのインストール
その5・PowerShell実行ポリシの変更
その6・Google Data APIアセンブリのGACへのインストール
その7・サンプルコードのコンパイル

Google Apps Email Migration APIのC#サンプルプログラムをコンパイルし実行・その1・サンプルコードのダウンロード

ダウンロード

サンプルコードmigrationsample.csをダウンロードする。ブラウザで『Google Apps Platform ― Google Developers』を開く。


画面左「Get Started」リンクをクリックする。


「.Net」タブをクリックし、「.Net Sample」リンクをクリックする。


画面右「File info」の中の「View raw file」を右クリックし、「対象をファイルに保存(A)...」を選択し、適切な場所にmigrationsample.csを保存する。

ブロックの解除

ダウンロードしたファイルに対して、以下を実行する。


右クリックから「プロパティ(R)」を選択する。


「ブロックの解除(K)」ボタンを押下する。


その0・概要
その1・サンプルコードのダウンロード
その2・Google Data API Installer MSIのダウンロード
その3・Global Assembly Cache Toolのダウンロードと改造
その4・Google Data API Installer MSIのインストール
その5・PowerShell実行ポリシの変更
その6・Google Data APIアセンブリのGACへのインストール
その7・サンプルコードのコンパイル

Google Apps Email Migration APIのC#サンプルプログラムをコンパイルし実行・その0・概要

メールシステムの切替作業では一般に、旧システムから新システムへメールデータ(メッセージなど)を移行を伴う。Google Appsでは、これを支援するためGoogle Apps Email Migration APIが提供されている。これに対応したクライアント側のライブラリがGoogleから提供されており、Java版・Python版に加えて、.NET版がある。今回はこの内、.NET版をインストールし、サンプルコードをコンパイルするまでの手順について解説する。

C#のコンパイルには一般に、Visual StudioのC#対応製品を使う。しかし、GUIを使わない簡単なコードであれば、.NET Frameworkに付属しているコンパイラで十分。今回は、.NET Frameworkに付属のコンパイラでコンパイルする手順を紹介する。

なお、このサンプルコードをC#からPowerShellに移植したものを『The Sample Code of Google Apps Email Migration API in PowerShell』で紹介している。


その0・概要
その1・サンプルコードのダウンロード
その2・Google Data API Installer MSIのダウンロード
その3・Global Assembly Cache Toolのダウンロードと改造
その4・Google Data API Installer MSIのインストール
その5・PowerShell実行ポリシの変更
その6・Google Data APIアセンブリのGACへのインストール
その7・サンプルコードのコンパイル

2012/10/08

Windows Server 2012のServer Core Installで、コンピュータ名を変更する

Windows Server 2012のサーバコアインストール(Server Core Install)で、コンピュータ名を変更する手順を紹介する。フルインストール(Full Install、通常のインストール)でも同じ手順でコンピュータ名を変更することが可能。

ログイン直後に表示されているコマンドプロンプトから
C:\Users\Administrator>sconfig
の様に実行する。

===============================================================================
                         サーバー構成
===============================================================================

1) ドメイン/ワークグループ:                     ワークグループ:  WORKGROUP
2) コンピューター名:                            WIN-U1BS1B06QL6
3) ローカル管理者の追加
4) リモート管理の構成                           有効

5) Windows Update の設定:                       手動
6) 更新プログラムのダウンロードとインストール
7) リモート デスクトップ:                       無効

8) ネットワーク設定
9) 日付と時刻
10) CEIP による製品の機能向上に協力             不参加
11) Windows ライセンス認証

12) ユーザーのログオフ
13) サーバーの再起動
14) サーバーのシャットダウン
15) 終了してコマンド ラインに戻る

選択するオプションの番号を入力してください: 2
「サーバー構成」メニューが表示される。
コンピュータ名を変更するため、「2」を入力する。

コンピューター名

新しいコンピューター名を入力してください (入力なし=キャンセル): hydrogen
新しいホスト名(ここでは「hydrogen」)を入力する。


「再起動」ダイアログが表示される。
「はい(Y)」ボタンを押下する。
再起動が実行される。

再起動後、コンピュータ名を確認する。
C:\Users\Administrator>hostname
hydrogen

C:\Users\Administrator>

2012/10/04

VMware ESXi 5.1上に、Windows Server 2012・Server Coreゲストをインストールする・その2

その1』の続き。

参考:『Windows Server 2008 R2 Server Coreのインストール

vSphere Clientから、新規にインストールしたゲスト(ここではhydrogen)を右クリックし、「コンソールを開く(L)」を選択する。

コンソールのメニューバーから、「仮想マシン(V)」→「電源(O)」→「パワーオン(P)」を選択する。

EFIのセットアップ画面が表示される。メニューからカーソルキーで「Boot Manager」を選択し、[Enter]を入力する。

「Boot Manager」画面が表示される。メニューからカーソルキーで「EFI VMware Virtual IDE CDROM Drive (IDE 1:0)」を選択し、[Enter]を入力する。

「Press any key to boot from CD or DVD...」と表示されるので、何かキーを押す。


インストールイメージが起動される。

「Windowsセットアップ」画面が表示される。確認して、「次へ(>)」ボタンを押下する。

「今すぐインストール(I)」をクリックする。

セットアップが開始される。

「インストールするオペレーティングシステムを選んでください(S)」で「Windows Server 2012 Standard 評価版(Server Core インストール)」を選択する。「次へ(>)」ボタンを押下する。

ライセンス条項を確認し、「同意します(A)」チェックボックスをチェック、「次へ(>)」ボタンを押下する。

「カスタム: Windowsのみをインストールする(詳細設定)(C)」をクリックする。

「次へ(>)」ボタンを押下する。

イストール開始される。再起動が実行される。


もう一度再起動が実行される。


「OK」ボタンを押下して、Administratorパスワードの設定に進む。

適切なパスワードを二度入力する。

「OK」ボタンを押下する。

Server Coreモードで起動する。

VMware ESXi 5.1上に、Windows Server 2012・Server Coreゲストをインストールする・その1
VMware ESXi 5.1上に、Windows Server 2012・Server Coreゲストをインストールする・その2